Friday, November 15, 2019

Have Dice, Will Travel

So, this is a thing that happened; I just did my first gig as a professional DM.

This has been a long time coming. I've been teaching D&D to people for years--decades, really, and using D&D to promote language arts, stimulate communication skills, and encourage role-playing and creative problem solving. I have also taught the game to lots of people who want to swing swords, cast spells, and kill monsters. So, win-win.

The professional Dungeon Master sits at the intersection of today's Gig Economy and the rise in Geek Culture. A lot of people are intrigued by Dungeons & Dragons, and would like to play the game, but there is still something about the game, no matter how well-written the current rules are, that make it an activity that is better taught by someone who knows what they are doing instead of puzzled out for oneself. YouTube has helped, somewhat, but honestly, there's no better learning experience than roiling the dice for yourself.

I suppose now I'll need to formalize a price sheet, and maybe put it on this site, and very likely update that, as well. Can't have a blogspot address, after all. Doesn't send the right message. Or does it? I make a point of stating I've been doing this for a while. I wonder if I can still get an Earthlink account?

Wednesday, November 13, 2019

Dice Delve: A Duo of Dueling Diffusions

The artisanal craft dice market continues to expand and contract like the big bang model of the universe in its own teapot tempest of a cottage industry. It's gotten so widespread and self-referential to have spawned the appearance of trends, I swear to Crom. Trends! For Dice! Lately the up and coming seasonal trend seems to be a spin on the glitter dice of old, only with confetti-sized sparkly-stuff suspended in clear acrylic, like a frozen snow globe. I won't be reviewing any of those dice.

But I did pop for something that was quite the rage last season, and that was clear dice with a second translucent (or two) swirled into the clear acrylic. As one of those "Oooh pretty" ideas, several (as in, many) dice companies dove into coming up with clever name and color combinations seemingly overnight; these things hit all at once, and there were actually concurrent Kickstarters running for two different company's iterations of these dice. I made the executive decision to get the same kinds of these "Diffusion" dice or "Ethereal" dice so as to better compare like with like. The question was, of course, "do I like?" That all depends.

Friday, October 25, 2019

DIY Corner: Condition Markers ( A Tabletop Tokens Add-On)

This isn't a full-on DIY Corner, but rather a Supplemental add-on to the post I previously made about making your own tokens for your tabletop tactical play. This method is cheap (relatively) and lets you customize your tokens to match your campaign style, your personal aesthetics, and your part preferences. Also, they cost out to about 27 cents a token. Pretty cheap.

I'm using them and the players are loving them. But I have three spell casters in my group and they are constantly casting hold spells, chromatic orbs, and all of that jive. For large battles and small, you need some condition markers.

Whilst tooling around on the Interwebs recently, I stumbled across a site that was selling pendant supplies (the cabochons and epoxy stickers I use for the tokens being, in the parlance of our times, otherwise known as "pendant supplies"). As I was glancing down the page, I noticed the glass cabochon embedded in a colorful ring, you know, to make a pendant.

It was these. They are bottle caps, painted a solid color and flattened into a crimp so that they can be used for crafting. Or in my case, poisoning player characters.

There are basically two kinds of conditions you need to keep track of; that master list that is printed in every DM screen and on every cheat sheet that exists for D&D these days. And then there's the special effects that get applied to characters like Rage and Hunter's Mark. I haven't added them all up but it's roughly twenty or so, depending on what you need help keeping track of.


These things are easy to get in bags of 100--more than you'll ever need, but if you want a wide variety of colors, you may need to truck over to eBay, where several sellers have multitudes of colors for not a lot of money.

All you have to do is mark them with a Sharpie (and use a fine tip, here, because the regular Sharpies are a little too fat to use on such a small space). In fact, I dropped the past tense on a lot of my tokens and wrote "Poison" instead of "Poisoned." You might think two letters doesn't make a difference, but trust me, unless you have tiny handwriting, it does. And I don't need to tell you to use a light colored Sharpie on the dark caps, do I? Please tell me not to worry.

Once marked, a handy cheat sheet (color coded) clips to your screen and you are all set.
To use, let's go to the tactical simulation. Oh, no! Looks like Padraic the Cleric of Knowledge and his trusted man-at-arms are engaged in combat with a Deep One and a Cultist. Jinkies!


Padraic is quick to cast a curse on the cultist in order to help out his buddy. So the cultist gets the metallic orange condition marker, and it's just that easy.


But the Deep One bites Padraic, and now he's poisoned, so he gets the bilious green condition marker and all of his rolls are at disadvantage now! And he keeps that ring until he can clear the condition. Thankfully, a quick prayer to Minerva and he's back in business.


And what about those pesky large (and larger) tokens we've heard so much about? Here's our hapless duo all entangled with a skeleton horde. That's gonna leave a mark!


Good thing Padraic brought his holy symbol on this little jaunt. A quick turn undead attempt and the skeletons back off and start running for the exit. Take that, boneheads! Just put the condition on top of the token and it's the same thing. You can even stack these condition markers up.


Note that if I wanted to, I could totally make a condition marker for Turned Undead. If I wanted to. I do not. But if I did, I could. I'm not even joking about this. I just pick a colored bottle cap, grab a Sharpie, and blammo. Please and thank you. Done and done. But I do not want to do that.

I made five of each condition just to keep everything nice and even. On the off-chance that you care, I will list what colors I used for each condition. You do you, though; pick colors that make sense in your brain.


Blessed--Metallic Gold
Blinded--Black
Charmed--Pink
Cursed--Metallic Orange
Deafened--White
Frightened--Yellow
Grappled--Light Blue
Hunter's Mark--Dark Green
Incapacitated--Dark Blue
Invisible--Metallic Silver
Paralyzed--Maroon
Petrified --Gray
Poisoned--Light Green
Rage--Red
Restrained--Orange
Stunned--Purple

There's plenty of other one-off conditions and lots more colors. I only did what I needed, and I'm going to wait until I need another condition before committing a color.

I really like the home-made feel to this solution. I remember when we had to make our own character sheets. We made our own dungeons. We scrounged everything we were using to play the game. I love all of the accessories that are available for D&D these days, but sometimes, it's better to DIY.


Wednesday, October 16, 2019

Dice Delve: Black Plague Dice

Oh, Halloween, with your banquet of delights, how I love you almost as much, if not more, than Christmas. Especially when people you like put out stuff that you love that lands in October like it was planned all along. I'm talking about Black Oak Workshop and their latest offering, Black Plague Dice.

Those of you keeping score at home know that I love Skull Dice, so much so that I did a little write-up about them last October. Well, lookee what I got in the mail the other day! Cool stuff for my ongoing collection! These are not my first Black Oak Workshop dice, either. How do these stand up?


Black Plague Dice by Black Oak Workshop
SCORE: 5/5

Clarity   Yes
Heft       Yes
Color     Yes
Theme   Yes
Value     Yes

I've backed several of their Kickstarter campaigns right now, and I've been very happy with the results every time. These folks do great design work, at an affordable (for an Artisanal Craft Dice maker) price, with great customer service and quality materials. You can't go wrong with them. You just can't.

These are their Black Plague Dice, with the iconic and also unique skull design. The Kickstarter unlocked the dice bag and the pin, too. All quality items. I'm keeping all of my dice in Black Oak bags at the moment.

Their Kickstarter was initially only for d20s , but enough people pledged that they were able to swing making a complete set of seven dice. This was awesome for me, as there are currently no other sets with the skull motif on them in so prominent a fashion. And none of that noodly-fiddly stuff around the edges, either (gives Q-workshop the side-eye).


In addition to a readable design, these dice are also slightly larger than the average polyhedrals. That means these clicky-clacks can be seen from across the table. Easy to read. No problem. An old grognard's delight, to be sure.


Here's a Gatekeeper d20 for size comparison sake. Their d20 dice are about a millimeter larger than Chessex dice, so you can really see the difference in size with the Black Oak dice here. Substantial. By the way, the Black Oak solid color polyhedrals have great heft to them, as well. These are now in my current DM bag.


As I said earlier, the bags are a delight; large, with excellent embroidery on the outside and satin on the inside. Available in a ton of styles. This is my new Skull Dice bag. I'm doing that little happy goblin dice dance inside right now.


The Good: Follow these guys on Kickstarter so that you know when the next campaign is going to start. And visit their website to check out their line of Lovecraftian bags and other great stuff.

The Bad: only when their stretch goals don't completely make and you can't get a full set of dice. Come on, People! Have a little faith! Craig's turnaround time on his dice is measured in months, not years. And I think he's getting his dice in America, so no worries about Chinese Trade Wars to disrupt your hobby.

The Ugly: There is no ugly. There is only good stuff. Black Oak Workshop is my favorite dice maker at the moment.


Friday, October 11, 2019

DIY Corner: Inspiration Tokens

One of the great additions to 5e D&D is the concept of inspiration, a way to instantly reward good role-playing, puzzle-solving, decision-making, or any other in-game thing a player does that the DM deems noteworthy.

The current rules suggest using a poker chip to give to the player with inspiration as a token to remind them and you that they get a do-over roll by handing it in.

You're probably award of the multitude of metal coins available to gamers great and small, ranging from the baffling to the bewildering, in a multitude of styles, and that's not counting the metric ton of inspiration counters, coins, tokens and d20 holders that can be found in all corners of the Internet with a simple search.

I'm not knocking any of those things. They are great. I've ended up with a few metal coins and tokens as ancillary throw-in items, and again, they look just fine and would doubtless make perfectly serviceable inspiration tokens.

But I wanted something a little different.

I love the idea of a durable poker chip, because players are, in very general terms, ill-tempered savages. The only problem is, modern poker chips are liberally festooned with card pips, aces of spades, and other gambling symbols, as well as being colorful and cheerful and oh just never mind. You could special order some chips, but that costs a ton of money. Likewise wooden nickles, although if I had my druthers, I'd use them exclusively. They look and feel old and you can put what you want on them. Now I just need to justify spending a hundred and fifty bucks to get 4 Inspiration Tokens and I'm all set!

While we wait for that little miracle to occur, I found a solution in the form of vintage poker chips. I was originally looking for anything that looked old, like something made out of Bakelite, but really quickly I stumbled across these. Look! It's a dragon! Or is that a griffin? They are old clay chips from the 1920s or 1930s. And as you can see, they are perfect.


There are a lot of other styles out there, moons and stars, owls, laurel wreaths, sailing ships, lighthouses, and so on and so forth. You can find them in groups of 1 to 12 (or more) and they are relatively inexpensive. I scored a lot of around a 140 chips for twenty bucks plus shipping. With so much surplus chip action at my disposal, I decided to experiment a bit.


Beige is boring. I wanted something that looked like a metal coin; that would be cool. However, I don't usually like the resulting texture of metallic paints, so instead, I used Rub 'n Buff. It's a wax polish with metallic pigment. It comes in a variety of colors, but I'm using silver.


To apply, you just need a little dab. That button will completely cover four chips, and then some. You can apply it with a brush or a sponge, but I think it works best if you do it using your finger. You get a feel for what it does and according to the manufacturer, the more you rub it, the more buff it gets. That feels like a come-on, but you never know with this stuff.


I apply the Rub 'n Buff in linear strokes, all going the same direction. This is because doing it the other way makes for an uneven coat. The goal is to lightly hit the surface, ignoring the small grooves that make up the dragon (griffin?). Do one side at a time, waiting for it to dry each time. It doesn't take long. Then you go around the edge and you are done. Unless you don't want to be.


You can do a thin wash and hit the groove if you want, or you can get a soft sponge and push/press the silver leaf into the grooves, and then smooth it out again. You can even paint the whole chip beforehand. You have options, here.


Now, let's talk about the aforementioned "variety of colors" that Rub 'n Buff comes in. This stuff is designed to add accents to furniture and other decorative pieces. In a weird fit of pique, I bought a set of 12 different tubes, just to try them out for myself.


 This is one of the many shades of gold they make. They work as well as the silver leaf and look pretty good. I put a black wash on the chip before I applied the Rub 'n' Buff so that the dragon (griffin?) would stand out more.


This is their antique white finish. It's intended to be a highlight for distressed wood. It's not metallic and the results are not good. But this is what it looks like.


This is their Spanish Copper, and I expected it to be more metallic than it was. The light is great on this chip, but under normal conditions, it's very dark and not so great.


This is another of their gold colors, this time over a red chip (hence the color of the dragon [griffin?]) They have like four different varieties of gold, so it's really just a question of brightness and personal tastes. I prefer the silver, but that's me.


Here's one I did for my ongoing Eldritch Piracy game. I did a black wash after the Rub 'n Buff dried, and the results were so-so. Better to paint the chip before and then do a light drybrush with your finger to apply the silver.

There is also a patina color that you can apply over their metallic brass. I tried it, but you have to be very sparing with it, and I could never get it to look right. But if you can, I'd do these chips in Grecian Gold and hit the anchor with a touch of the patina and call it a day.


And if you want to get really crazy, here's a two-color Rub 'n Buff project, using Silver Leaf and Antique Gold. I primed the chip with flat black, and lightly applied the silver leaf. When it was dry, I carefully, oh so carefully--maybe too carfully--hit the anchor with the gold. It looks okay, and with touch-ups, it'll look super swell.


The colors of Rub 'n Buff that yielded the best results for this particular project were the silver and gold, hands down. But your mileage may vary. You could even paint them (and seal them) some other color. Silver and Gold are the two colors of Rub 'n Buff you're most likely to find in craft stores. Anything more exotic than that and you'll have to mail order it.

One quick warning about these chips; they are durable, but not indestructible. I've dropped a chip from a height of about five feet onto a concrete floor and it shatters like rock candy. For flipping across the table, they hold up just fine.

I think these inspiration tokens add a little something extra to the game; it's not a prop, but it's more than a check box on a character sheet. And there's something tactile about handing it to the DM to get that extra roll. Everyone's game is different, but these suit my play style perfectly.


Wednesday, October 9, 2019

It's Official: We're the Cool Kids, Now

I don't know exactly when it happened; maybe sometime last year, around the middle of the summer, but there was a gigantic clicking sound that knocked my vinyl glow-in-the-dark Cthulhu piggy bank right off of my shelf. By the time I'd picked it up, the world had changed.

No, I'm not talking about The Snappening. This wasn't Thanos doing his infinity-gauntlet-beatnik-hand jive. But someone somewhere did something. Maybe it was a tipping point. Maybe it was Joe Manganiello making some talk show appearance in a Tomb of Horrors shirt. Maybe it was Stephen Colbert getting to play D&D for charity with Matt Mercer and geeking out about it. I don't know what, but we aren't a sub-culture any more. Hell, we're not even popular culture. D&D and tabletop gaming are officially mainstream now. And I can prove it with math.

1+1=Pandering 2U
The first salvo was quiet, and you like as not didn't hear it unless you're deep into The Nerdist, Monte Cook, and the Amazon series Carnival Row, one of Amazon Prime's new exclusive series set in alternate history steampunk Victorian London and starring Orlando Bloom. Yeah, I know, I'm practically ovulating just typing those words in sequence.

The series is okay to great, depending largely on where you come down on the topic of alternate history steampunk Victorian London television series starring Orlando Bloom. But it seems that Legendary used its relationship with the Nerdist to do a little demographic mining by getting Monte Cook (yes, THAT Monte Cook) to whip up a splat book for his Cypher System set in the Carnival Row Universe.

This isn't a half-assed effort, either; they put what appears to be production art (though it could well be original material) and stills from the show into this detailed setting designed to get you steampunking with all due expediency. If this sounds like something you'd dig, you can get it for free right here.

If you didn't hear about this, no worries. It's cool, and surprisingly fast (though having the inside track certainly helps with the timing), but the real indicator that we are across the Rubicon is the newest tabletop RPG from Wendy's.

Yep. Wendy's.

I don't know who did it (there is no writing credits listed) but I can very well guess why. Gamers eat fast food, and many of them drive to games every week, and I'm sure a great many of those folks pass by a Wendy's and maybe even swing into the drive-thru lane for a quick burger and fries on their way to thwart evil. I mean, I'm sure of it; I have no real numbers, and neither does Wendy's, for that matter. But someone is clearly (forgive me) rolling the dice that they are achieving heavy market saturation by putting out a complete, full-color role-playing game, available as a free downloadable pdf (and they even did a small print run for New York ComicCon), complete with branded dice (again, at the convention), in the desperate hope of looking cool to their customer base.

The premise of Feast of Legends is simple: you are part of the Kingdom of Wendy's Trademarked realm, which involves flames and fresh meats. Your enemies live in a deep freeze, where their meats are frozen and bear passing resemblances to Wendy's real-world fast food competitors and their somewhat concurrent brand mascots. You resist the powers of cold and ice by belonging to one of the Orders of Wendy's Trademarked Menu Items, which gives you different powers and abilities.

Are you getting this? See, it's a role-playing game! You like those, right? Only, we've cleverly inserted all of our registered trademark shit into it. But you still want to play it, right, because we're subverting expectations by taking pot-shots at our competition, even though the very same battle is being waged daily on Twitter in 280 characters or less.  So it's clever, right?! But we're not trying to be, you know, which is why we paid at least three people to design this game system, do full-color artwork and fifth edition-style layouts, and package this into the most expensive, and yet also most legit-looking freebie in the history of happy meals.

I haven't felt this conflicted since I first saw the Dungeons & Dragons cartoon in 1983. On one hand, I knew that something significant had happened, and on the other hand, I felt like (for the first time, and most certainly not the last) like they had completely missed the point. A little yoda-like old man, called the Dungeon Master? Uni the Unicorn? This was not my world. I didn't know who this was for, really; the younger siblings of the older kids who were actually playing AD&D?

That's how Feast of Legends makes me feel. Only with much better artwork.

The tone of the game is somewhere to the left of tongue-in-cheek, and to the right of outright parody. They play it straight, but the very idea that I can be a character belonging to the Order of the Chicken Nugget is absurd, and that may be what they were aiming for. I don't know.

The game itself is beer and pretzel fare; good for a few hours, and best used in the hands of an expert seat-of-the-pants game master with a quick wit and a penchant for punnery. This, then, becomes a performance piece as your group attempts to out-funny one another, and oh, yeah, the monster is attacking, roll to hit, while you're at it. I can't see playing it more than once under those conditions.

I mean, to make it work right, you'd really need to re-write the enemies so that there's no doubt as to who your players are fighting. And I'd make more of them, too; a horde for every shitty fast food company out there. And of course, the navy is controlled by Long John Silver, who can't stay on deck because he's constantly slinking off to the poop deck, which is, let's be honest, what LJS makes everyone do; shit like a goose). Get it? He's pooping on the poop deck! I got a million of them!

This almost works as a pocket universe to get your existing group sucked into, and play it straight until they figure it all out. Again, one or two nights only. They put a lot of background material in the book, and it's still not enough. To do anything to it would require more effort than the task is worth.

Content-wise, the setting is designed to riff on A Game of Thrones ("you kids are still watching that show, right? About the blonde with the dragons? What's her name again?")  It's too bad that the twitter bots didn't do a pass over the manuscript, because the parodies of the other fast food places don't go nearly far enough. But you can see McDonald's if you squint. It's just not that funny.

So, from a cultural standpoint, this is the Hardware Wars of the 21st century. It gets some stuff right, but it gets a lot more wrong. But this is the place it occupies in the zeitgeist at the moment, a kind of Well-What-Do-You-Know-About-That that's more of a sociological signifier for the uninitiated than the faithful. But they still want you to play the game. And, you know, maybe stream it, with hashtags. Because that's what the cool kids are doing.

And speaking of streaming, the folks I feel the most sorry for are the Critical Role cast. They had to do a dog and pony show with this rule set (I think it was a charity event, but still...). That's not even a double-edged sword. That's a good old-fashioned dagger in the back ("Dance, you circus freaks! Dance for your corporate overlords! Ah Hah Hah HAH HAH HAH!"). This cannot possibly be what Matt Mercer envisioned for himself, nor anyone else on the show, for that matter. It's one thing to be a working voice-over actor in L.A. with a side gig that gets you more likes than your day job; it's quite another to be so good at the side gig that you are courted by the very people who would not put you in one of their commercials. Queen Wendy, indeed.

Well, it's already made the news cycle, and generated a crushing wave of publicity for Wendy's when they most needed it. You can expect that we'll see more things like this in the next 2-3 years. The flood of products and games and pandering is only just beginning. Now we are a demographic, and they have identified a dollar amount that they can reasonably expect to extract from us, like squeezing a naval orange. It's only a matter of time. What form will the Destructor take? No idea. Your only hope is to clear your mind. Don't think of anything. Please...


Friday, October 4, 2019

DIY Corner: Make Your Own Random Tables

It's really a rite of passage: you have these options, these choices, and you want to use them all on your hapless players, but you can't decide, and then all at once, it hits you like a Thunder Wave spell, and you think, "I'll just make a random table! It's easy! I've been listing things off my whole life!"

Then you get started. And you write some stuff down, and then you erase a couple of entries, because you want them to be a the top and bottom of the list, and one thing leads to another and the next thing you know, you've got an unruly mess, but it's a table. Your first. And it's glorious. You think to yourself, "Now, at last, I truly am a Jedi Knight Dungeon Master."

It's a rush, and maybe you think, that was so much fun, I'll do another. And another. And another and another and another, and...then one day, you're writing up some notes for your next game and you realize, "this is just another random table." That's okay, too. But I will always have a soft spot for the all-powerful random table. Few things are as useful and also as easy to create. They can really flavor your game in unique ways because it's 100% created by you.

Since I prefer to work away from the computer for all sorts of neck-beard-y reasons, I wanted to utilize this newfangled technology but still keep it lo-fi whenever possible. So I made this up: It's a worksheet for making d20 (or any other integer) tables. One side has the numbers 1 to 20 listed, and the other half of the sheet is made of graph paper. Why graph paper? Because sometimes I like to make little charts, or draw a dungeon room, or do a little statistical math, and I don't want any of that in the margins of my nice list. Sometimes I want to brainstorm before I make that list. That's where the graph paper comes in. It soothes my fevered brow. Let's me organize my scrambled thoughts. Helps me see the problem a little clearer.


When I'm done brainstorming and mucking about, I can write my d20 (or any other integer) list, taking time to put the entries where I like them, and then if I want, I can fold that scratch sheet back and run the table, as is. Clean and simple.

It's not much, but it's free. If you can use it, be my guest.

Most recently, I decided I wanted my group to actively conscript their crew for their ship, but I didn't want to waste a lot of table time on it. So I made a list of 20 candidates, with just a basic string of information and one personality characteristic that I could throw at them when they met the crew member. I had each player roll and tell me the result, and I did a little interaction with each crew member. It worked very well and helped establish for them that these crew members were NPCs and not cannon fodder. They've all got a favorite, too. God help me if a mutiny breaks out.

So, that's the DIY Corner for this we--

"But Mark, what about d30 tables!?"

Well? What about them?

"Those are totally a thing, too, you know!"

Yeah, I know, but the d20 tables are so much cleaner. So very...

"But you put a picture of that old-as-dirt Armory d30 table book up there! What are we supposed to think?"

I've said it before, and I'll say it again: d30 dice are the Spinal Tap of polyhedral dice.


Me: You've got percentile dice, you've got d20s, what do you need the d30 for?

Nigel: Well, it's ten more, innit? You're rolling dice, you get to twenny, there's nowhere else to go, so what do you do?

Me: You reach for the D30.

Nigel:  Exactly. The D30.

Me: But what if you just used percentile dice, or maybe cut your choices back to the top 20 and have a kick-ass d20 list instead?

Nigel:...this is a d30.

*Sigh*

Okay. Fine. Here. It's a d30 Table Worksheet. Orientation is different, but the concept is the same. Don't say I never did anything for you, Nigel.

Friday, September 27, 2019

DIY Corner: Dice Trays

Have you priced dice trays lately? They are ridiculous.

They look cool. True. And they are quite useful, especially if you have one or more players who like to give their deice the ol' spin "for luck" and send their bones skittering across the room. But the cost is outrageous. Twenty-five dollars for a wooden version of the Monopoly Box Lid we used to roll six-sided dice into? Thank you, no. I'm sure the product is very good, but for that kind of money, I want a little control.

There's a ton of videos on YouTube that show you how to very complicatedly make dice trays. You can sure do that if you want to. But I don't have the time, the patience, or the tools. I just have the vision, in my head, of the dice tray that I want, and I have a 40% off coupon for Michael's. That's more than enough.

And I have made a couple of dice trays out of picture frames. One of them is quite cool; it came with plastic pieces on the corners that resembled metal brackets, and so it was halfway to looking like something found in a dwarven keep to begin with. The problem with picture frame dice trays is that they are elusive, unless you want to break glass, fish pieces of glass out of a crevice, and yadda yadda yadda. Basically, you need something deep enough to act as a reservoir for the dice, but the glass has to be behind the wood completely, so that when you unscrew the back of the frame, everything comes out nice and neat.

I know you think that's easy to find, and if you're looking for regular picture frames, you're right. But we want high (or deep) side walls, and those frames only come around once or twice a year. I suspect they are being bought up by gamers for the explicit use of turning them into dice trays, because as picture frames, they are kinda crappy.

Here's how I solved that problem. I can make a dice tray for about five bucks, unless I need to buy a can of spray paint. Then it's, I dunno, seven bucks or something. But the thing is this: my dice tray is one of infinite possibilities. Any color I want, any interior felt I want, stain or paint, simple or complicated, I am only beholden to my level of craftsmanship.


I start with these. These are "Art Panels" made of wood. They are designed for decoupage, painting, or any other Summer Camp Craft idea you want to use them for. Wood burning. Is that even a thing, still? I don't care.

Wal-Mart sells the 10" square frame with just enough lip on it to qualify as usable (right). Dollar General sells an 8" square that is chunky and deep and just right for a DM to have behind his screen or any table where space is a premium (left).  For the pictures below, I will be using both, as I did not get complete pictures from either build.


These picture frame/art panels are made of cheap bass wood, and are made about as well as you'd expect. The thing you want to look for is actually not on the front but on the back. That's the interior of the dice tray. Look for rough spots or splits on the inside, or at the corners for a misalignment.

Inside here, in the corner, is a rough spot where the wood was split, or a knothole, or something. Ordinarily I wouldn't have bought this, but it was the last one, so I am just going to take extra care with the steps below.


First thing to do is  sand the sides down, to make them smooth to the touch. I use a heavy grit sand paper to lightly and quickly knock out any rough patches. I also put a little more pressure on the edges and the corners to soften and smooth them down. Finally, I sand down the inside walls of the dice tray, getting as much inside the corner as I can. This takes all of a couple of minutes, and really helps later when you're applying paint. The finished tray looks nicer, too, and is less of a lethal weapon. See where the edges are rounded and smoother?


Before you go any farther, it's best to make a template for your felt insert. To do that, get a piece of regular cardstock (the kind you do papercrafts with) and measure it carefully and cut it to size with an Xacto knife or other straight edge. For the 10" frame, the interior is 8 1/2" square and for the 8" frame, the interior is 6" square.

Note: it will not fit. It just won't. It never does. But go ahead and make your square cardstock match your seemingly accurate measurements. Now, try to slip it in. Did it hang on one side? Two? Those are the sides you will trim by minute increments using your straight edge. And don't cut two sides at once. Cut one side. See if it fits. If it does, cut the other. If it doesn't, trim some more. It sounds tedious, but it only takes a couple of minutes to adjust. Just go slow and take your time and don't get in a hurry. When you're done, you should have a square piece of cardstock that falls right into place and requires the flat side of your hobby knife to lift up out of the dice tray. That's what you are looking for.


Once completely sanded, I like to prime the tray. This takes a couple of passes to get even coverage on the inside and outside walls of the tray.

I spray the inside, but just to overspray the inside edges and corners. Occasionally I will sand back the primed dice tray with fine grit sand paper to keep the smooth surfaces.


Once the primer is dry, you're on your own. You can paint the tray a solid color, or use a faux finish of some kind. You can create a "theme" for your game or a particular character. I've done everything from faux marble to hammered metal (and there are tutorials online for anything like that you want to do). But for a first-time project, you may just want to go with staining the wood.


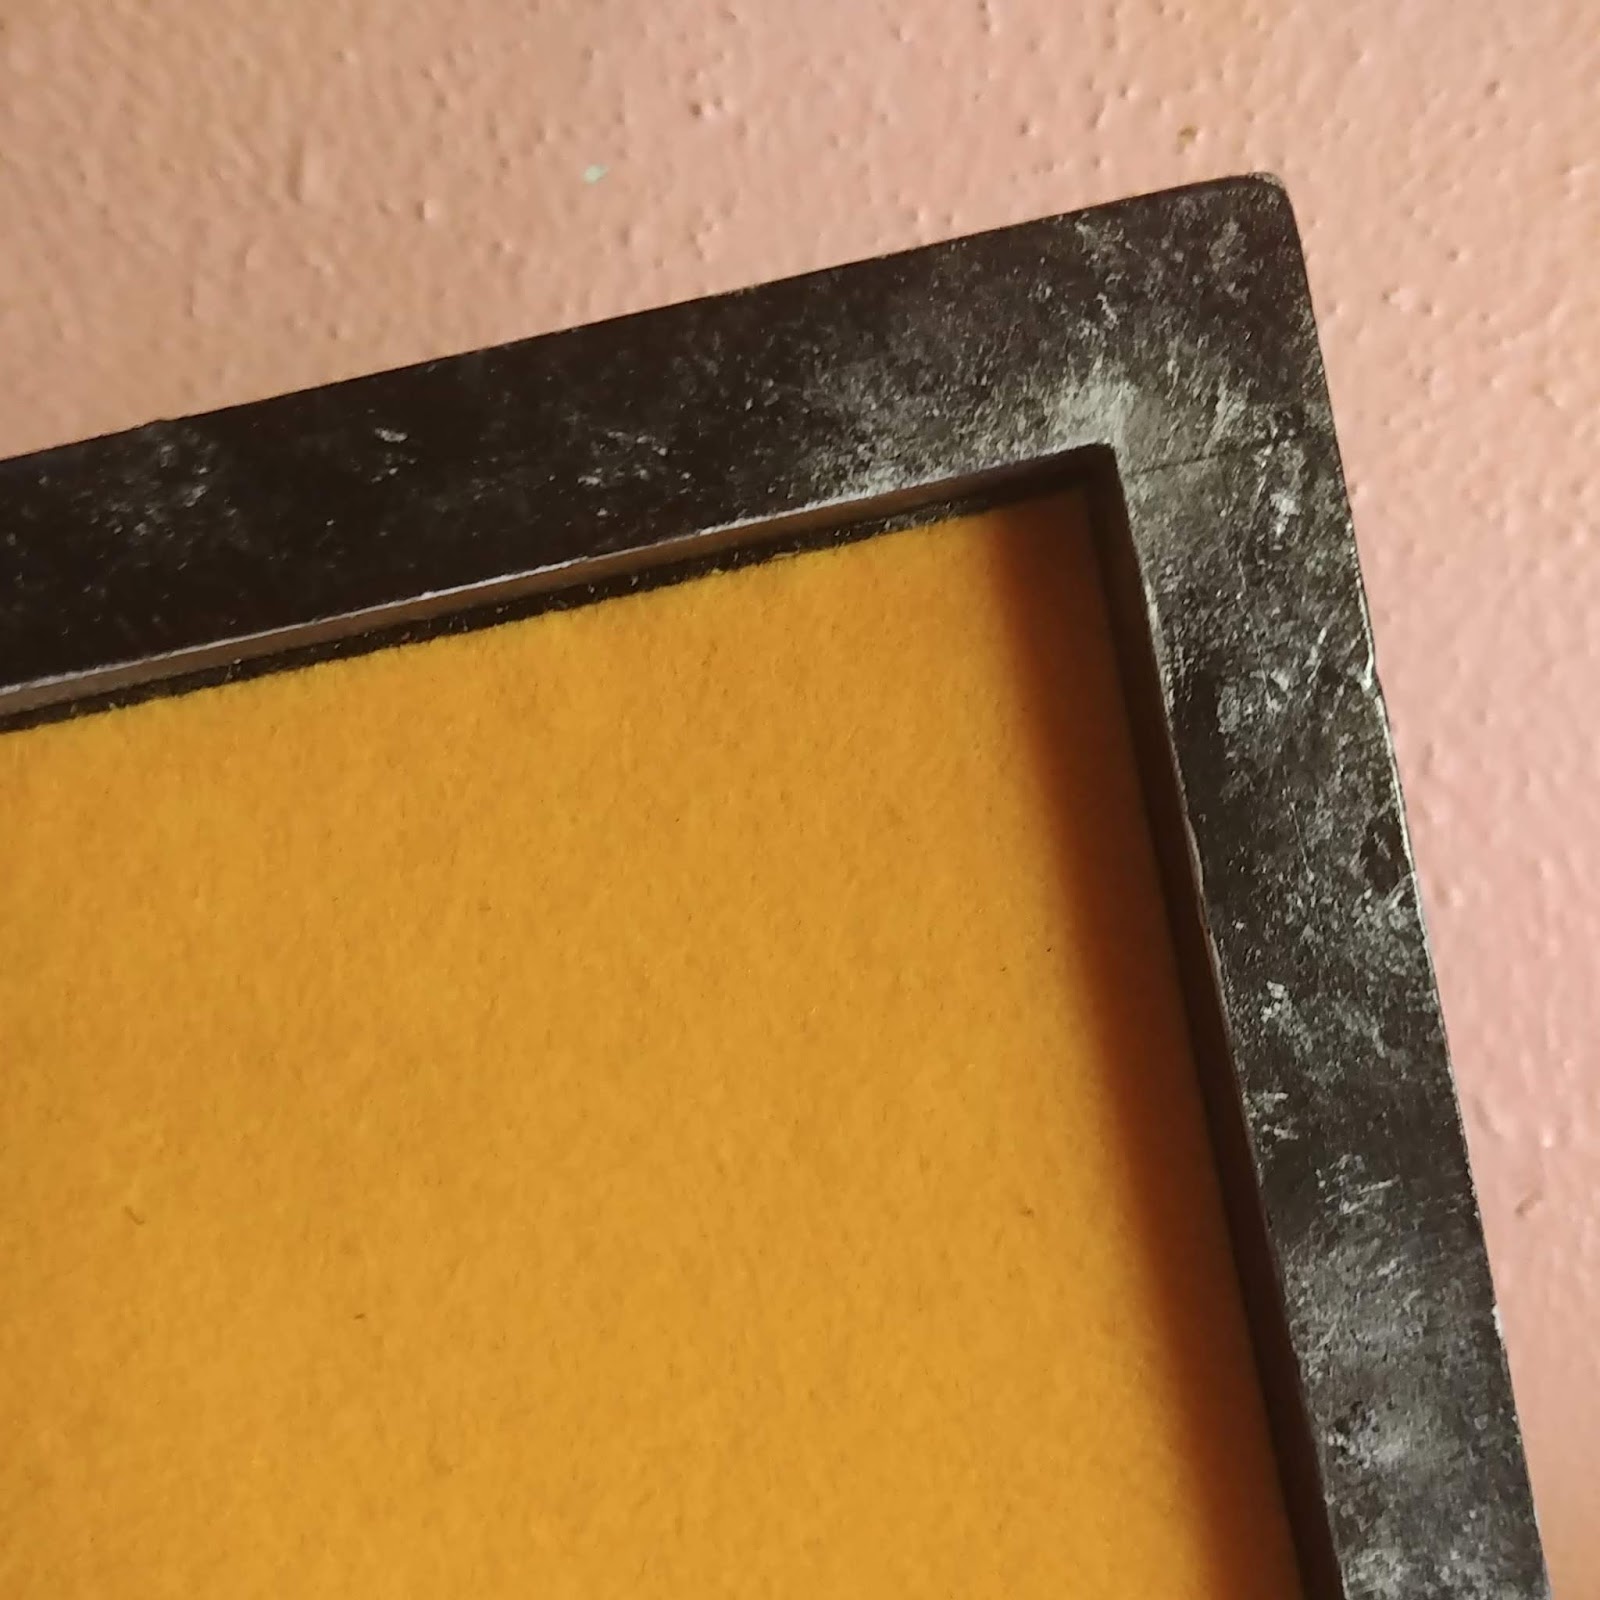
This was a tray I made for my player who has a warlock that made a pact with The King in Yellow. I used antique silver Rub 'n Buff to make the edges shiny like worn down metal. This may be the coolest tray I have done to date. It got gasps and profanity when my player brought it out at the table.


This tray was made just so see if I could do it. I wanted to make a faux marble finish, like the old Vampire rpg books, you know, green mausoleum marble. It turned out better than I could have hoped for. You can't see it, but there are some flecks of blood in one corner.

Here's the wood, stained and sealed with a gloss coat. It looks surprisingly good. I've also done several dice trays using the 8" art panel that turned out gorgeous with a couple of coats of stain and some intentional sanding back to distress the wood. It really picks up an antique or a nautical appearance.


This was the first dice tray I tried. It's got one coat of stain and a flat sealer, because that's all I had. And you know what? It's just as nice as the others. This does not have to be a complicated project.

If I'm staining the wood, I don't prime the tray. I use a gel-based stain, and it's pretty cheap but it's also a little finicky to use, so I will just wipe down the tray with a damp cloth to remove the dust and grit and let it air dry before applying the stain. I always apply heavy and wipe it off, and do a minimum of two coats to really bring out the grain of the wood.


While the paint or stain is drying, you can start on your felt insert. Craft felt is very inexpensive and comes in a myriad of colors. You can buy it with a sticky back, and it's a little more expensive but also easier to work with. Or you can get regular felt and trust your glue-fu. Don't worry if you mess it up. Felt is cheap. Cardstock is cheap. Glue is cheap.

If you are using adhesive felt, peel off the back and stick the cardstock insert to it. Don't use the edge of the felt to save cutting; the felt edges are wonky. Stick the square down so that there's at least a half-inch of felt or more around each side.

If you're using regular felt, first apply a thin, even layer of Tacky Glue or your favorite craft glue. This, even coat. Use scrap cardstock to scrape it thin if you need to and be sure to cover the whole surface of the card. No globs, no glorps. You are going to stick the cardstock insert to the felt and use a heavy cylindrical object to smooth the cardstock out so that you don't have bumps in the felt on the other side. No bumps in the felt is your only concern right now. Also, excess glue. Wipe up any oozes immediately. If you'd used adhesive felt, you wouldn't have to do this, but no, you wanted teal felt in your wooden dice tray for some unfathomable reason, so here we are, rolling felt and wiping up glue.

After the felt and the cardstock are one, take your straight edge and your sharp craft knife and cut away the excess felt. You may have to adjust the fit as with the insert above. That's okay. It's also okay if you cut a hair too much and there is a gap. You can center the felt in the middle of the tray and no one will notice the gap. I know this because the first one I did had a 1 mm gap and I've been using it for years and to date no one has noticed, or cared.

Before you apply the felt to the inside of the tray, you will want to seal the wood and your paint/stain job. You can use flat or gloss, and the choice is entirely up to you. But I'd recommend two coats just to be sure you get everything.

Now you can put the felt in. Simply apply more glue and repeat. Again: no bumps. Use a Sharpie to roll across the interior and remove lumps. Something else you can do, if you are afraid of commitment, is to not fasten the felt to the cardstock. I have found that the backing on the adhesive felt cuts great and if you are diligent and patient, your felt will slide into the tray and stay there, even when you want to turn it upside down and shake it. Now you have a rolling surface that you can swap out as the mood strikes you.

Last thing I do is probably not strictly speaking necessary, but it's classy and we are all about class here at the North Texas Apocalypse Bunker. Take four 1" furniture pads and affix them to the corners. Yes, those are the same non-skid pads I use to make tokens with. Just stick them into the corners, slightly offset from the edges, and you are done.

These trays are cheap enough that you can make one for every player and for yourself without wracking up enormous debt. Five trays cost me as much as one of the deluxe fancy-schmancy trays on sale across the Interwebs. If you use the 10" square panels, they don't take up too much room in storage, either, stacking nicely on top of one another. The are lightweight, but strong, and don't move around on the table, thanks to the feet.

My players love their trays and use them for every game they play. Good dice rolling habits cannot be learned early enough.


New Digs, Patreon, and More

  Hey folks, This blog is going to remain up, but I won't be adding to it any more. I never quite got it off the ground and did everythi...